Thursday, November 30, 2017

Craftsy Goldwork Class - Part 4

Last Friday, I received the passing thread Lucy Barter was kind enough to send me. I had to be good and finish Hedebo Enchantment before I could start but I didn't waste much time once it was done. She sent me two bundles of passing, I'll have extra to play with.


First order of business was to finish my basket weave. Based on pictures I've seen of Lucy's finish there should be eight rows of passing to fully cover the arc. Some places were filled by the time I got to the sixth row, but you really need eight to fully cover the design lines.


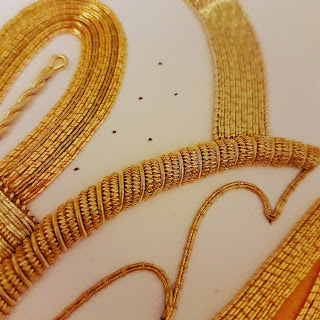
No more plunging! I was really happy to reach this point. Above and below the basket-weave, I couched over stretched pearl purl.


The instructions said to only wrap the bottom one with thread, but I decided to do both as I liked the look. There was more overstretched pearl purl at the top with a piece of looped bright check. It gives it a lovely contrast.


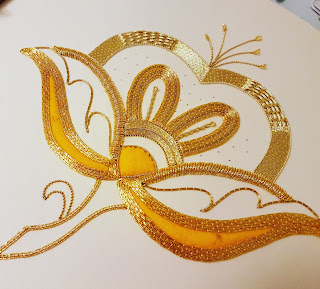
From here on out, everything that is left is considered cutwork. This is where the metal thread is cut to size before being embroidered. The first technique is s-ing. It's basically a stem stitch with a quarter inch piece of smooth purl. I love this technique, it gives such a lovely texture and look to the piece.


This next part is what cutwork is all about. I did a tiny bit of it on my butterfly back in March and Foxy a little bit more on his tail, but nothing like this flower. I did find that as I went along it was getting easier and easier to do. I initially drew diagonal lines on the string padding to help me follow the line, but I quickly gave that up.


Usually if your string padding is the same all the way through, you can measure a piece of check or smooth pearl and just cut the rest the same size. Since mine tapered off on each end, I couldn't do that. I had to measure out every single piece. Below, you can see where I marked off my smooth pearl for cutting. To mark off the smooth pearl and bright check you just lightly press with your finger.


This area of the flower is worked alternating between smooth pearl and check. Doesn't it look pretty?


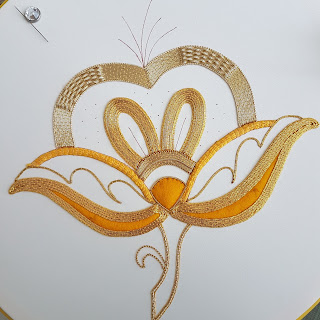
Now that I'm so near the end, I'm taking a few steps back to really look at the piece. I love the choices that Lucy made, especially where she alternates two different types of metal threads, like the Japanese and passing, and the smooth pearl and bright check. The piece really glimmers and shines because of it.


I'm almost done with the piece, I saved the best for last: chipping! I started yesterday and the felt in the center is already filled in. Tonight I will work on the left side.

Tuesday, November 28, 2017

And Done!

I did work on my hem this weekend as planned. The hem was stitched a little differently from the hem on my Italian runner but the concept is still similar.

First step was to cut off the excess fabric. The design specified how many threads to count out. If you look closely you'll notice that a thread is missing. This acts as a channel to make sure I cut my fabric straight.


Here is my fabric all cut and ready to go.


I finger pressed the fabric making sure to keep five threads for my buttonhole. Normally you would use an iron but I couldn't with this fabric. The humidity from the iron could shrink the fabric as it's real linen. It was also better to do it by hand since my fold was so small. I wanted to make sure it was accurate going all around. Once I finished going around, I unfolded the edges and cut off the corners at a diagonal.


 I refolded my hem and put in pins to keep it in place.


Now I was ready to start. I had to get used to this buttonhole. The Hedebo buttonhole is similar to the buttonhole we use in Hardangar except we're coming in from the back. This adds a little twist to the thread.

Hedebo Buttonhole
Hardanger Buttonhole
It went much faster than I expected. By Friday night I had hit the half-way point and Saturday morning I was able to speed through the other half.


Here is my piece all finished. It's still very wrinkly at this point. I'm just waiting for more specifics on the materials I need to gather from Jette and then I'll be washing and ironing my piece. I also need to buy a pillow and backing fabric. So it's not completely finished, I still have a few hours to put into it.


Jette was very generous with her kit. Here is what I had left from the threads that were included in my kit. I have plenty to start and finish another Hedebo piece. Just need to get my hands on linen fabric.


Since Hedebo Enchantment is done, I've already pulled out my next project to finish. I decided to go with goldwork and am well on my way. I wouldn't be surprised if Monday I will be posting another finish ;) I'll try to publish an update post sometime this week so I don't overwhelm you with information later.

Friday, November 24, 2017

Almost there

For the past week or so, I haven't really been up to stitching. Work has really been draining what energy I have that all I felt like doing was sitting with my Kindle. Whatever stitching I did do was all concentrated on Hedebo Enchantment. (If you're reading this by email, click on the link to open it in your browser).

Last time I showed you the large drops with the pulled thread pattern. The center circle and the smaller drop are a little different. The circle is actually cut open and secured with a buttonhole edge. You can see it in action below.


The small drops are stitched the exact same way as the circle.


I had some trouble getting them all to look uniform and I'm still not a hundred percent happy with them, but that's okay.


The small drops have an extra step to finish them off. This technique is called needle lace. If you're familiar with Hazel Blomkamp's books she uses this technique a lot in her designs and even has a book dedicated to the technique.

The blanket stitch around the opening acts as an anchor. A line is then extended from one side to another and back. This is where you then start to needle lace. It's basically blanket stitching in the air. It's very fiddly, you want your line to be taught but not too much you distort the sides. Your stitches need to be tight but not too tight and they have to have enough space to breath on the line.

Note: If you ever decide to try this out, don't do it in white your first time. It is very hard to see your stitches. Also, don't try it with linen thread. Linen thread is not as smooth as mercerized cotton, so it will sometimes snag on itself. The first time I ever tried this technique was in a class with Hazel and she had us using DMC Special Dentelles in colors.


So here is my center all done. I finished it yesterday and was so excited I jumped right into starting the hem. I will be working on that this weekend and hopefully I will have a "finish" to share with you next week. It won't be 100% finished until it's been turned into a pillow, but it will take me some time to gather everything I need.


Monday, November 20, 2017

November TUSAL


Since I've only been working on three projects this month, there isn't much color in my jar. It's all white! There is a change this month, I have two new ORT jars that will be added to my TUSAL report. First, is my goldwork container that has more metal threads in it.


The other is my silk ORTs container from my Japanese embroidery class. I'll have to get it a proper jar soon. I think I want to keep them separate from my regular ORT jar so I can see how much stitching I get done.


Last week I received my missing beads.


And I'm still waiting for the passing thread for my goldwork project, but I've decided since I'm so close to finishing Hedebo Enchantment that I will not work on the others until it's done. I'm so close I can taste it :)

Tuesday, November 14, 2017

Waiting

I'm still waiting for the passing thread for my goldwork flower. So I took out the next piece on my pile of WIPs, my phase 1 Japanese bead embroidery piece and...ran out of beads.


I knew this was going to happen (Carolyn warned me ages ago) and should have placed another order. I guess I was too optimistic.


I could have started on the last bit that needs to be beaded, in between the leaves, but I decided to wait. That piece went back in storage and the next piece came out, Hedebo Enchantment. The border all around is done for now and I've moved onto the center.


I wasn't planning on stitching the center portion as I though it would be finished into a table center and that area would be hidden by a vase or something. My mom asked me to finish it into a pillow instead, so now the center has to be stitched. This also means that eventually I'll have to figure out how to do the actual pillow finishing. I think I will contact Jetta, the teacher, and see what suggestions she may have.


There are three different patterns for the center: the center circle, four small drops and four larger drops. I've started with the larger drops as it doesn't involve any cutting. They're stitched with a pulled thread pattern and then surrounded by two rows of chain stitch. They're kind of hard to see because it's all done in white. In retrospect, I think there should have been more color in the center. Maybe the chain stitch could have been done with the other linen thread that came in the kit.

The plan now is to keep stitching on Hedebo Enchantement until the passing or beads come in. I'm hoping it's soon as I'm not really inspired by my hedebo piece right now. 

Thursday, November 9, 2017

Craftsy Goldwork Class - Part 3

After a few days of rest from my Japanese embroidery class, I went back to stitching goldwork. The next part is the stem which is stitched with over stretched pearl purl wrapped with floss. The instructions say to wrap with green floss, but that didn't appeal to me. It took me a few days, but I decided in the end to use the same silk thread I used in Pearl Butterfly. The silk is a cream Soie d'Alger by Au Ver a Soie.


Wrapped pearl purl is exactly what is sounds like: you over stretch the pearl purl by gently pulling on it and then wrap the thread around the pearl purl so that it slips in between the coils. For this piece, I used four strands of soie d'Alger.


You wrap as much as you think you'll need. Before cutting my silk thread, I guesstimated how much I would need by laying the silk along the outline of the stem and added about an inch on each end for finishing. Once the coil was wrapped, I started couching it down using a single strand of matching thread.


I couched every 2-3 coils. I might add more depending on the curve to really set my line properly. For sharp corners, I just bend the pearl purl in the opposite direction first before laying it down.

You'll notice that I left a strand of silk at the beginning. That's on purpose. Once I reached the other end, I unwrapped the silk so that the wrapped coil ends at the edge of the stitching (if that makes sense).


The extra pearl purl is cut-off so I ended up with a length of silk sticking out and proceeded to finish couching my pearl purl.


Below you can see my stem couched with the wrapped pearl purl and the silk is sticking out on each end. These will be plunged later in the same way we plunge Japanese and passing thread.


Japanese thread was then couched on each side of the pearl purl. Luckily this is the last bit that uses it as I had very little left in my kit.


Once everything was couched, it's all plunged to the back.


I'm very happy with my choice of thread. It came out very nice and the silk thread looks like little pearls. By the way, the little leaf outline is stitched with overstretched pearl purl that wasn't wrapped. You can see that it gives a completely different effect to the piece.


Since I was doing so well with the piece, I decided to continue onto the next bit. This technique is called basketweave stitching. It adds dimension to the piece and looks very pretty once you get it going.


The basketweave effect comes from alternating where the thread is couched between the hard cord padding. You couch at intervals of 2, alternating which ones between the rows.


I was really in the groove, until I realized I ran out of passing thread. This is the last section passing thread is used in. I still have three rows of double passing to couch and only have a single short strand left. I wasn't wasteful and didn't have to unpick anything so it means there was a miscalculation when my kit was put together.


I posted a picture on Instagram and got a quick response from the San Francisco School of Needlework and Design where Lucy Barter teaches. They said to email Lucy and she would send me more passing. Isn't social media amazing! Lucy said she would mail me more on Monday, so I've set my piece aside for now. In the meantime, I'll just work on something else.


Tuesday, November 7, 2017

Japanese Embroidery Phase 1 - part 4

On the third day we got to learn something I've been wanting to try for a while now, the Japanese knot. It's not a French knot or a colonial knot (it is a little like a colonial knot). I found a video a while back that makes it looks so easy (they do it with one hand!) and they always come out looking pretty. By the way, from here on out the light is horrible. We had rainy days for the last two days with zero sun.

To stitch a Japanese knot we had to learn how to do a new twist. So far we'd been doing a Z-twist, but for knots you need an S-twist thread (read more about twists here). I'm not a 100% sure but I think that if you use a Z-twisted thread, you lose the twist when you do the knot. We did some practice on the side first before we worked on our actual piece. Once we were ready, we stitched some knots at the tip of the petals which were then covered with flat silk. So all in all, it didn't really matter if the knots looked pretty so we got some extra practice there. I love how mine came out, they're so plump.

I left my flat silk in there so that I can cut thread and re-use it later
From there we moved onto more flat stitching on the diagonal. This is very similar to how we stitched on the large petals of the iris but with flat silk instead of twisted. I had a better time with the flat silk, not sure if it's because I had practice or it was the thread. The flat silk plumps up more than the twisted, covering more area, making it look nicer.

I started off with a smaller leaf as they are harder to do. I did pretty good with the first one, but kind of lost my way on the second. They don't say it in the books but there is a better side to start on: if you start on the wider side, then by the time you get around you can angle your stitches better. I'm not going to take it out, instead I will try to figure out how to fix it.


We got more demos than we did stitching on the third day. Sue showed us how to twist silk with a strand of metal thread and how to make our own couching thread. You can buy couching thread from the JEC, but they come in limited colors. Knowing how to make your own means you can use any flat silk from the more than 200 colors they have in stock. We also covered how to make a tight twist which involves wetting your silk to set it.

At the end of the day, we prepared the wrapping paper for stitching the next day by putting in guidelines. This time we also outline the edge of the paper. The reason for this is once the paper is embroidered, we will be stitching a couched outline all around it. Putting in the guidelines lets us know where to start and end our stitches.


Day four started out just as dreary with bad lighting. I found the bad lighting affected my stitching. I was very frustrated with my morning progress. You can clearly see in the picture below that my line is not perfectly straight.


After a talk with one of the more advanced stitchers (thank you Pam) I realized two things. One, all that I'm doing now will be covered with so many other layers plus the couched outline that you won't even see much of the foundation I'm embroidering much less the jagged edge. And two, I was stitching in the wrong direction. I should be stitching top to bottom, not bottom to top as I had been doing. After flipping my frame around, things progressed much better.


Afterward, Sue gave us a demonstration on the wrapping paper on Pam's piece which was ready for the last layer to be applied. I'll have to check my books, but I think on top of the weft layer foundation we started stitching, there are about 3 or 4 layers of held lines and on top of those we stitch a lovely geometric pattern with gold threads.

While Pam was preparing her piece for another demonstration, we jumped to another area of the piece. I'm really loving flat silk stitching.


I had time to finish my strand of silk before we got called over to Pam's frame for a demo on padded cords. There was so much to cover but so little time to do it in. Luckily we have an excellent group of advanced stitchers here in Montreal that we can consult later and Sue isn't very far away from us (she lives in Ontario).


In the confusion of the packing, I forgot to take a picture of the entire piece. Sue demonstrated how to stitch the pinks last. I had already cut the flat silk and didn't want it to get ruined, so I started a bit of the first petal.


And then it was over. I'm sad and annoyed it passed so fast. Just when we finally got the hang of things and were ready to really do some stitching, it was time to pack up. We also had so much fun just being together under one roof, I wish we could meet up more often. Many of us live in Montreal and work full time, two members of our group had to travel to Montreal (Patricia from Quebec city and Pauline all the way from British Columbia). So understandably we can't meet very often.

Top from left: Pam, Suzie, Marilyn, Sue Sprake, Patricia, Jose, Pauline
Bottom from left: me, Natalie with Eva and Noah, Nancy
But I will be seeing some of them next month. We've scheduled to meet at Nancy's house on December 2 and for the first time I will be doing actual Japanese embroidery at her house instead of beading :) It won't be the last time I will see Pauline and Patricia either, they'll both be going to PEI in July for seminar. Something else to look forward to.