I've finally started finishing Hana. When I'm finishing something I usually do it over a period of a few days since it's not a process that I enjoy. So even though I'm writing one post, this actually happened over a period of six days. I'm finishing both the fob and scissor case at the same time, so I was constantly jumping from one to the other. I hope it doesn't confuse anyone.
Tuesday, December 20: The first step was cutting out the fusible interfacing and fusible wadding for the fob. I basically measure out the stitched beading area and created a template on tracing paper. This was used to cut out the proper sizes. The instructions also said to cut out two smaller fusible wadding square, which I did.

Wednesday, December 21: Before cutting out the embroidery, I read the instructions on the scissor case (I'm using the instructions from Inspirations issue 89 for the Chatelaine by Susan O'Connor). The instructions said to do a running stitch (I'm using quilting thread) around the piece before cutting it out and leave 5 cm of thread at the beginning and end. This was not how I learned to finish items, but I figured I'd try it.

At this point, my measuring tape broke and had to hunt down a ruler :( I'm hoping my dad can doctor it. Again.

Once I stitched the running stitches, I FINALLY took Hana off the hoop.

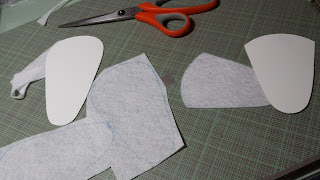
I started cutting out the pieces and while doing that I kind of wished I had stitched them closer to the edge so as not to waste the fabric. Lessons learned for next time.

The pieces cut out!

Jumping into the scissor case, I used the template to cut out the thin cards. When I bought toe socks they came with these thin boards. I kept them just in case (2 years ago :P) and they have proven themselves useful :)

Using the cut cards, I traced the fusible wadding
Here they are all cut.

I've never used fusible interfacing or wadding before. It turns out you have to put the iron at maximum heat for it to really fuse. I learned something new :) Here is everything all fused up.

Note: The next day, as I'm driving to work I remember I shouldn't have fused the thin cards for the scissor case before using them to trace on the dupioni Silk. Oh well!
I placed the smaller fused card wadding facing down on my embroidered piece and started pulling on the quilting thread and tried to knot it to finish it off. It wasn't working, so I called my dad to help me do the second knot over. We pulled so hard the thread snapped.

I ended up redoing the running stitch and this time I laced the back of the piece the way I learned how from Katherine Drummond. That worked out much better.


I gave it a go, but found that the corners are not as they should be. That and using glue kind of bothered me.

So I took out some black sewing thread and made tiny black stitches at each corner to properly finish them off.

I was supposed to use glue on both sides of the fob, but no way I was going to do that to my embroidery, so I just sewed the corners again.

Here they are. The next step is the black cord and cutting the dupioni silk for the scissor case.

Thursday, December 22: I'm making the cord today. A friend on Instagram had suggested trimming the scissor case with a cord to match the fob. So made a small one for the fob and a really long one for the scissor case.

Friday, December 23: I needed to decide what fabric I was going to use for the back part of the scissor case. So I posted a picture on Instagram and left it there for the day to see what the reaction would be.

While I left that to percolate, I started finishing the Hana fob. The pieces are stitched together using a ladder stitch. The instructions said to stitch 3 sides and at the end when nearing the end attach the cord. I decided to attach the cord first to the black fabric and then start ladder stitching the pieces together. This gave me more space to move around.

When I had one side left, I started stuffing.

I found out this summer what the true intention for the fob was. It's to protect your scissors when they fall. Your fob is always supposed to be heavier than your scissors, that way when it falls it will land fob first protecting the tip of your scissors. The instructions suggested a heavy coin. I was lucky enough to find a 2016 Canadian loonie in my wallet :) which is great since this project was started and will be finished in 2016.

I checked Instagram at the end of the day and found the black on black was the popular choice.

So I started marking the black dupioni silk to cut.

The markers I'm using are Gelly Rolls by Sakura. They are recommended by Mary Corbett for transferring designs on dark fabrics. I couldn't resist getting more colors. Especially the purple!


The instructions I'm following for the scissor case weren't clear on this next part. I'm supposed to tack around the shape, but I couldn't figure out a way to do this properly and get the right shape. So I ended up cutting some fusible interfacing and fusing it to the back of the three fabrics.

And then I did something I said I wouldn't do again, I used craft glue on the edges to glue them to the back. They came out really flat. Thinking back I realize that maybe I shouldn't have fused both pieces of the fusible wadding to the thin cardboard for the back piece. I think I will look for a better set of instructions next time.

Saturday, December 24: I didn't get a lot of chance to stitch, but I did get the front piece done.

Sunday, December 25: I finished stitching the back piece and sewed it together to the front with the cord. Unfortunately, I was struggling too much with sewing it together to remember to take pictures of this. Suffice it to say it was hard. I need to find a better way to end cords than knots. They are really hard to shove into a tight space and they leave a bump. You can't just cut the knot off without the whole thing unraveling. I did that, but I was sweating bullets hopping I'd be able to sew everything away without it affecting the parts that have already been sewn down.
The final product is lovely though. Unfortunately after days of sunlight, we've had zero sun once I'd finished it. I'm hoping we'll have some good light early tomorrow morning and I'll be able to take pictures to share with you.
Tuesday, December 20: The first step was cutting out the fusible interfacing and fusible wadding for the fob. I basically measure out the stitched beading area and created a template on tracing paper. This was used to cut out the proper sizes. The instructions also said to cut out two smaller fusible wadding square, which I did.

Wednesday, December 21: Before cutting out the embroidery, I read the instructions on the scissor case (I'm using the instructions from Inspirations issue 89 for the Chatelaine by Susan O'Connor). The instructions said to do a running stitch (I'm using quilting thread) around the piece before cutting it out and leave 5 cm of thread at the beginning and end. This was not how I learned to finish items, but I figured I'd try it.

At this point, my measuring tape broke and had to hunt down a ruler :( I'm hoping my dad can doctor it. Again.

Once I stitched the running stitches, I FINALLY took Hana off the hoop.

I started cutting out the pieces and while doing that I kind of wished I had stitched them closer to the edge so as not to waste the fabric. Lessons learned for next time.

The pieces cut out!

Jumping into the scissor case, I used the template to cut out the thin cards. When I bought toe socks they came with these thin boards. I kept them just in case (2 years ago :P) and they have proven themselves useful :)

Using the cut cards, I traced the fusible wadding

Here they are all cut.

I've never used fusible interfacing or wadding before. It turns out you have to put the iron at maximum heat for it to really fuse. I learned something new :) Here is everything all fused up.

Note: The next day, as I'm driving to work I remember I shouldn't have fused the thin cards for the scissor case before using them to trace on the dupioni Silk. Oh well!
I placed the smaller fused card wadding facing down on my embroidered piece and started pulling on the quilting thread and tried to knot it to finish it off. It wasn't working, so I called my dad to help me do the second knot over. We pulled so hard the thread snapped.

I ended up redoing the running stitch and this time I laced the back of the piece the way I learned how from Katherine Drummond. That worked out much better.

Jumping back to the fob, the instructions said to use craft glue to miter the corners. I started with the dupioni silk.

I gave it a go, but found that the corners are not as they should be. That and using glue kind of bothered me.

So I took out some black sewing thread and made tiny black stitches at each corner to properly finish them off.

I was supposed to use glue on both sides of the fob, but no way I was going to do that to my embroidery, so I just sewed the corners again.

Here they are. The next step is the black cord and cutting the dupioni silk for the scissor case.

Thursday, December 22: I'm making the cord today. A friend on Instagram had suggested trimming the scissor case with a cord to match the fob. So made a small one for the fob and a really long one for the scissor case.

Friday, December 23: I needed to decide what fabric I was going to use for the back part of the scissor case. So I posted a picture on Instagram and left it there for the day to see what the reaction would be.

While I left that to percolate, I started finishing the Hana fob. The pieces are stitched together using a ladder stitch. The instructions said to stitch 3 sides and at the end when nearing the end attach the cord. I decided to attach the cord first to the black fabric and then start ladder stitching the pieces together. This gave me more space to move around.

When I had one side left, I started stuffing.

I found out this summer what the true intention for the fob was. It's to protect your scissors when they fall. Your fob is always supposed to be heavier than your scissors, that way when it falls it will land fob first protecting the tip of your scissors. The instructions suggested a heavy coin. I was lucky enough to find a 2016 Canadian loonie in my wallet :) which is great since this project was started and will be finished in 2016.

I checked Instagram at the end of the day and found the black on black was the popular choice.

So I started marking the black dupioni silk to cut.

The markers I'm using are Gelly Rolls by Sakura. They are recommended by Mary Corbett for transferring designs on dark fabrics. I couldn't resist getting more colors. Especially the purple!

I also marked one inch away from the edge to give me an idea of where to cut. I'm really bad at judging distances.

The instructions I'm following for the scissor case weren't clear on this next part. I'm supposed to tack around the shape, but I couldn't figure out a way to do this properly and get the right shape. So I ended up cutting some fusible interfacing and fusing it to the back of the three fabrics.

And then I did something I said I wouldn't do again, I used craft glue on the edges to glue them to the back. They came out really flat. Thinking back I realize that maybe I shouldn't have fused both pieces of the fusible wadding to the thin cardboard for the back piece. I think I will look for a better set of instructions next time.

Saturday, December 24: I didn't get a lot of chance to stitch, but I did get the front piece done.

Sunday, December 25: I finished stitching the back piece and sewed it together to the front with the cord. Unfortunately, I was struggling too much with sewing it together to remember to take pictures of this. Suffice it to say it was hard. I need to find a better way to end cords than knots. They are really hard to shove into a tight space and they leave a bump. You can't just cut the knot off without the whole thing unraveling. I did that, but I was sweating bullets hopping I'd be able to sew everything away without it affecting the parts that have already been sewn down.
The final product is lovely though. Unfortunately after days of sunlight, we've had zero sun once I'd finished it. I'm hoping we'll have some good light early tomorrow morning and I'll be able to take pictures to share with you.
I love this project! Absolutely gorgeous. I didn't know about the fob being heavier than the scissors. Learn something new every day!
ReplyDeleteWell done for getting them finished, it seems it was a mammoth task! I don't blame you for not using glue, i wouldn't either
ReplyDeleteYou could maybe wrap cord ends tightly with a single thread - it should create a softer and less lumpy end that would be easier to tuck away.
ReplyDeleteThank you for all the finishing details, they are such lovely projects. I didn't know about the fob being heavier than the scissors either.
ReplyDeleteWhat incredible instructions! I am so impressed you saved the Sock cards for all this time and found a good use for them too.
ReplyDeleteInteresting fact about the scissor fobs too, I didn't know that.